Blanklock installation and operation
This unit is designed to fit many right hand side hammer muzzleloading guns with the drum & nipple breach. Do not use this unit on the left side of a barrel; the vent will not be in alignment with the bore. For some this is a Do-it-yourself project. Others may wish to use the services of a competent gunsmith. A gun with the bolster type breach can be used, but requires machine shop work to mill off the side of the bolster and drill and tap for the blanklock device. The thread size is 10 X 1.25 MM. The drum & nipple type guns are a lot easier to convert to blank operation. Among the brands of available guns that will work include CVA, Traditions, and Jukar all of which use the 10X 1.25 MM thread size.
For the time being the use of the blanklock system is with the blank as the sole propellant that is without any added gunpowder. The pressure ratings of barrels by different manufacturers will vary according to metallurgy, production methods, barrel dimensions and caliber. Pressure and strain tests need to be done before the use of black powder or appropriate substitute will be deemed safe. If the gun is to be used anyway with black powder or black powder substitute then use only level one power loads. Those who must experiment should use good sense and go easy. Please note the following warning:
Under no circumstance should smokeless powder be loaded into a gun using this propellant device. If you do so the gun will automatically explode and kill you and others around you. Any questions? The reason for this is known by those who are knowledgeable in proper handloading practices. If while loading you run out of primers, you should not substitute magnum primers. The hotter ignition will increase the chamber pressure to possible dangerous levels. Now imagine the results if a primer is used that is hot enough to expel the projectile from the barrel by itself.Installation
Installation is simple enough if you have the necessary shop tools to do so. Basically you remove the drum and nipple from the barrel and install the blanklock unit. Here are the steps involved.
1. Remove the barrel from the gun after making sure that the barrel is unloaded!!!
2. Remove the nipple from the drum (don't use the nipple in step #6 because it will break and the threaded base is difficult to get out).
3. Replace the nipple with a bolt with the same thread pitch as the nipple (usually 6 X 1mm).
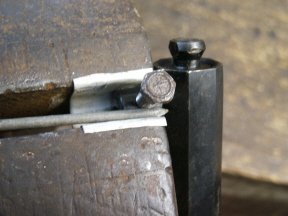
4. Using a bench vise, tighten the drum in the right side of the jaws with the bolt pointed up. Support the base of the bolt against the front vise jaw with a 1/8Ē round piece of steel. Note the photo below.
5. Heat the breach end of the barrel (which is not loaded. Right?) until it is hot enough to sizzle a drop of water, (around 350 to 400 degrees) don't overheat it! and quickly go to step #6.
6. Cool only the drum with water until it stops sizzling and lever the barrel down to initially loosen it. An adjustable wrench should finish the removal of the drum.

If it breaks...
Corrosion due to time and poor cleaning technique is one cause of hard removal of the drum. The other is the use of thread locking compound when the drum was installed. The threaded base must be drilled out with a 11/32" bit and tapped (10 1.25mm). Care must be taken so that it is drilled out on center and that the tap follows the original threads in the barrel. If you suspect the possibility that breakage might occur, allow the breach end to soak in some penetrating oil for a few days before attempting to loosen the drum.
7. Thread in the blanklock unit as far as it can go with the striker lever positioned up and left. Place the barrel in the stock and align the striker of the unit with the face of the hammer. Tighten the nut to complete the installation.
Note: It is best that the unit is threaded in as far as possible before tightening. If it is close but not quite far enough to align with the hammer then remove it and note where the bluing was rubbing. Generally it will be right at the end or the first turn of the threads at the end of the threaded portion of the unit. Carefully grind or file at these spots. Donít over tighten!
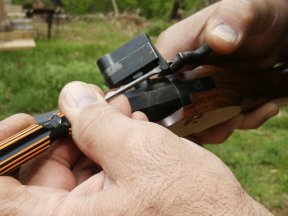
8. Check the striker lever for ease of movement sideways under the hammer with the hammer pressing down on it. The lever while being pushed down by the falling hammer must also slide slightly under the face of the hammer without binding. See the photo below.

Any binding of the lateral movement of the striker lever will inhibit the impact of the firing pin on the rim of the cartridge. This can cause no-fire problems. The source of any binding must be removed by filing and polishing.
Operation
The operation of this unit is simple enough. Open the breach by rotating it forward to reveal the chamber. Insert a blank cartridge in the chamber and return the breach to the closed position. To remove the spent round, rotate the breach all the way forward then about halfway back. The extractor will slide under the rim of the cartridge and extract it part way to loosen it. It is easily removed from there.
The safety
To engage the safety, rotate the breach forward enough to allow the hammer to be lowered all the way down and not touch the striker lever. After lowering the hammer, rotate the breach so that the side of the striker contacts the front of the hammer. In this position the loaded round is partially exposed so that the loaded condition of the gun is easily seen. Also, the firing pin is not aligned with the rim of the cartridge which prevents the possibility of firing. Returning to fire mode requires two motions, cock the hammer and rotate the breach back to the fire position. If the breach is not fully closed the gun will not fire.
Removing a stuck projectile
If you want to use this device to clear the barrel of a stuck projectile while using the gun with the standard percussion or other ignition device then one must be able to switch from one to the other device in the field. Once the percussion drum and nipple is successfully removed it can often be re-installed more easily than the initial removal. Sometimes it needs to be taken off and on several times before a wrench will be all you need. Remember that the nipple should not be used in this operation, so use the substitute bolt. If there is a load of powder of the proper type in the barrel, then use a level one blank. Also be sure that the projectile is seated all the way down before firing.
Above all, proper gun safety procedures must be followed at all times. The ballistic energy that a gun with this device has is more than enough to be dangerous or even deadly if mishandled. So think and use common sense, be safe and enjoy, a gun with this device is a lot of fun as long as carelessness is avoided, so please be safe.
Good Shooting!